Nuxt.js Integrating With noVNC
Nuxt.js Integrating With noVNC
近期作者遇到需要使用VNC連線到FAB內網的需求,
有評估過使用Python、C#等程式寫一個簡單的UI,讓User點Icon開啟VNC,
但考慮到需要一次性部署到30~50台以上的電腦...
再加上更新版本還要寫一個更新的Service,又有網段差異,最終選擇Web開發
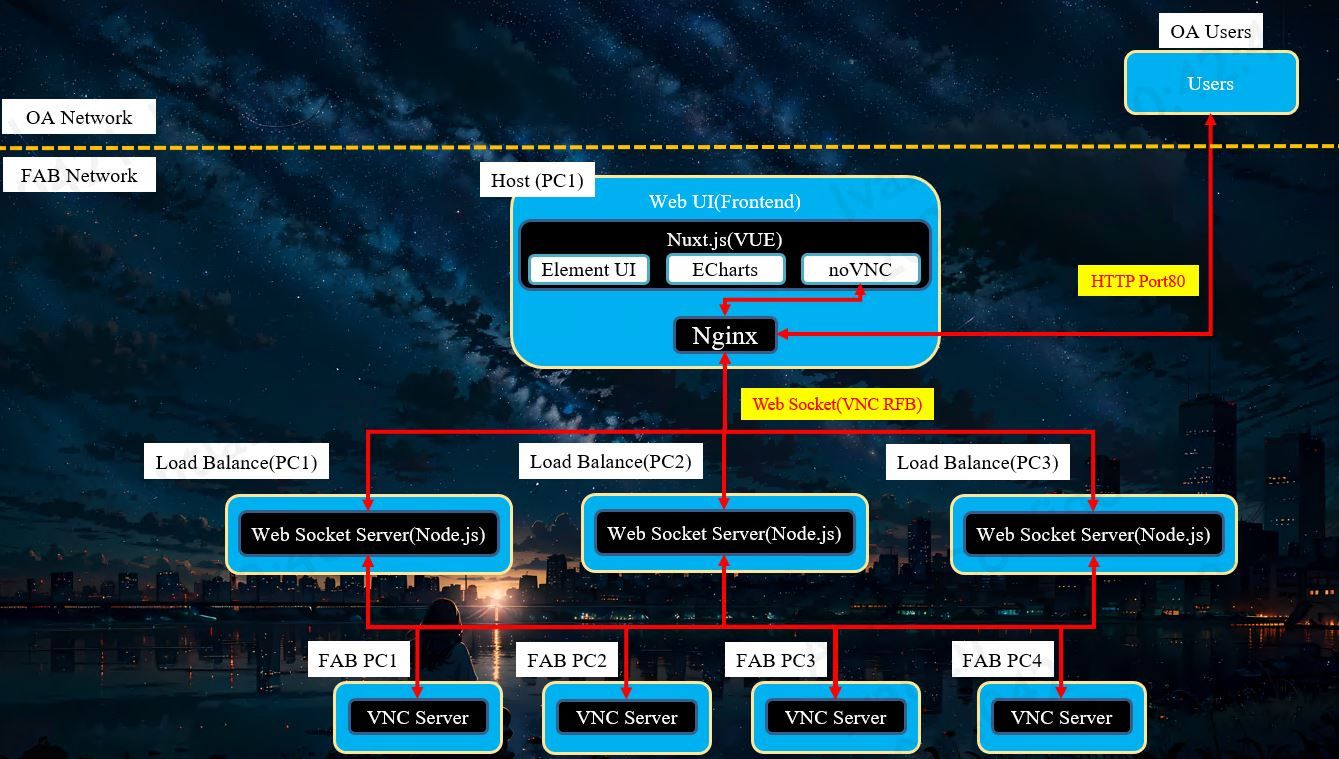
要讓User在OA與FAB網段都能使用
開放條件只有Port 80,因此需要掛代理
最終畫出來的圖就變成這樣
Tower of God 666
Deployed Kit(部署套件)
# node.js (v18.19.0)
# package.json / 主要套件3個
{
	"@novnc/novnc": "^1.4.0",
	"nuxt": "^3.11.1"
}
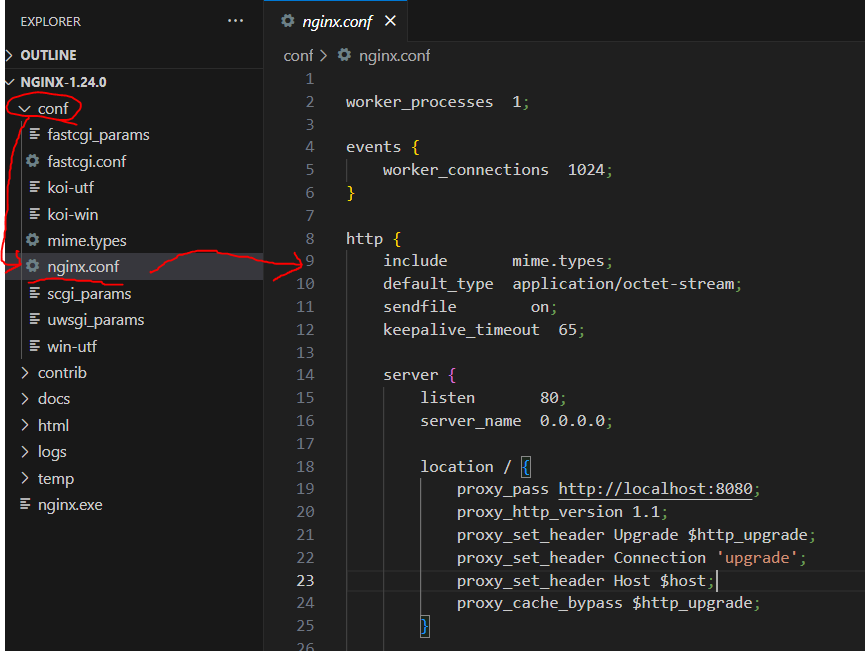
Step1. Setting Nginx
Proxy Host: 192.168.1.51
Let "location /vnc/" URL Tag Redirect to WS Server(http://192.168.1.51:8112/)
worker_processes  1;

events {
    worker_connections  1024;
}

http {
    include       mime.types;
    default_type  application/octet-stream;
    sendfile        on;
    keepalive_timeout  65;

    server {
        listen       80;
        server_name  0.0.0.0;

        location / {
            proxy_pass http://localhost:8080;
            proxy_http_version 1.1;
            proxy_set_header Upgrade $http_upgrade;
            proxy_set_header Connection 'upgrade';
            proxy_set_header Host $host;
            proxy_cache_bypass $http_upgrade;
        }

        location /vnc/ {
            add_header      Access-Control-Allow-Origin *;
            add_header      Access-Control-Allow-Headers "Accept, X-Token, Content-Type";
            add_header      Access-Control-Allow-Methods "GET, POST, DELETE, PATCH, PUT, OPTIONS";
            proxy_pass      http://192.168.1.51:8112/;

            proxy_http_version 1.1;
            proxy_set_header Upgrade $http_upgrade;
            proxy_set_header Connection "upgrade";
        }
    }
}
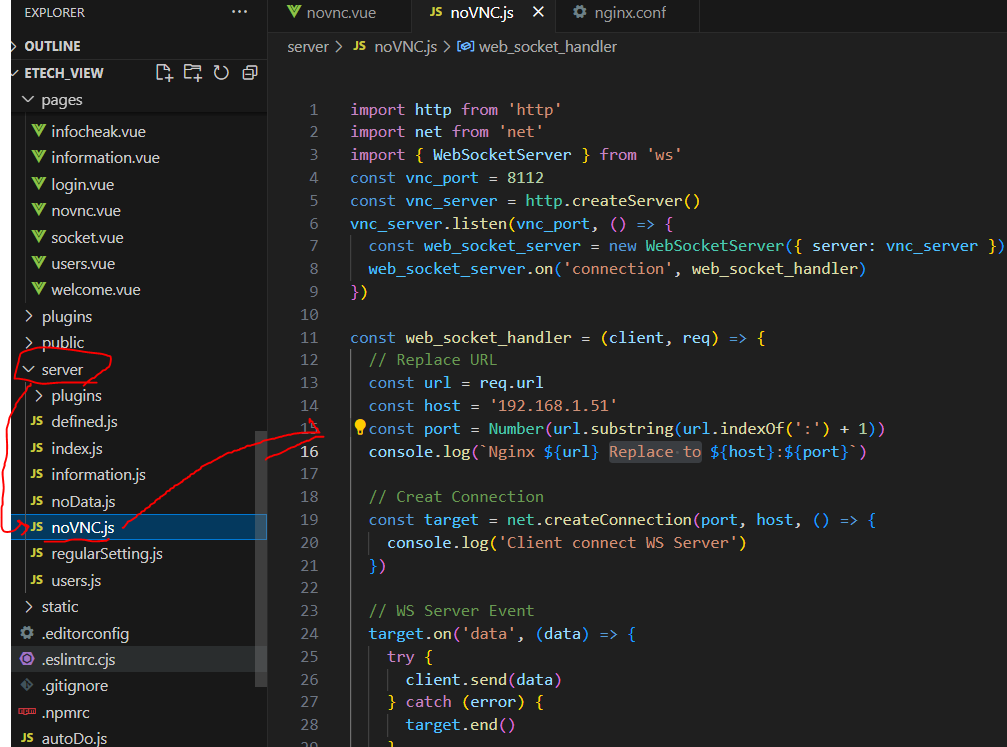
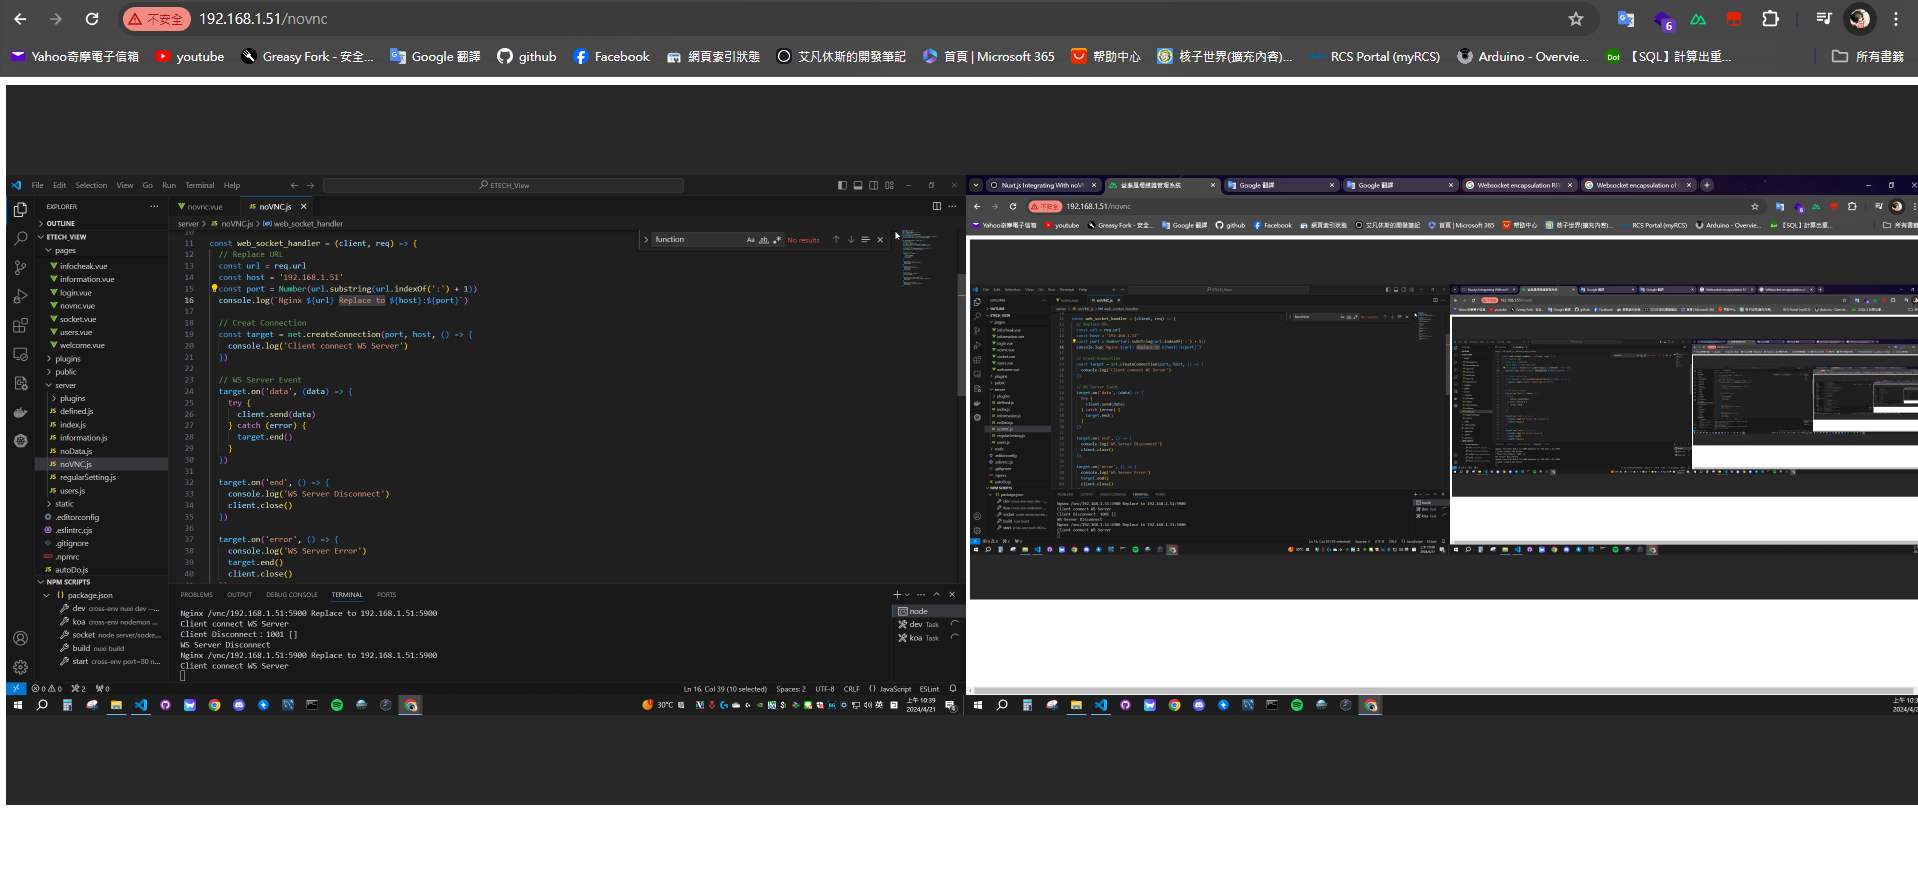
Step2. Build a WebSocket(WS) Server For RFB
Create WS Server With "192.168.1.51:8112"
and Replace URL!!
"/vnc/192.168.1.51:5900" (From Nginx)
Replace to "192.168.1.51:5900"(WS Server)

import http from 'http'
import net from 'net'
import { WebSocketServer } from 'ws'
const vnc_port = 8112
const vnc_server = http.createServer()
vnc_server.listen(vnc_port, () => {
  const web_socket_server = new WebSocketServer({ server: vnc_server })
  web_socket_server.on('connection', web_socket_handler)
})

const web_socket_handler = (client, req) => {
  // Replace URL
  const url = req.url
  const host = '192.168.1.51'
  const port = Number(url.substring(url.indexOf(':') + 1))
  console.log(`Nginx ${url} Replace to ${host}:${port}`)

  // Creat Connection
  const target = net.createConnection(port, host, () => {
    console.log('Client connect WS Server')
  })

  // WS Server Event
  target.on('data', (data) => {
    try {
      client.send(data)
    } catch (error) {
      target.end()
    }
  })

  target.on('end', () => {
    console.log('WS Server Disconnect')
    client.close()
  })

  target.on('error', () => {
    console.log('WS Server Error')
    target.end()
    client.close()
  })

  // Client Event
  client.on('message', (msg) => {
    target.write(msg)
  })

  client.on('close', (code, reason) => {
    console.log(`Client Disconnect:${code} [${reason}]`)
    target.end()
  })

  client.on('error', (error) => {
    console.log(`Client Error: ${error}`)
    target.end()
  })
}
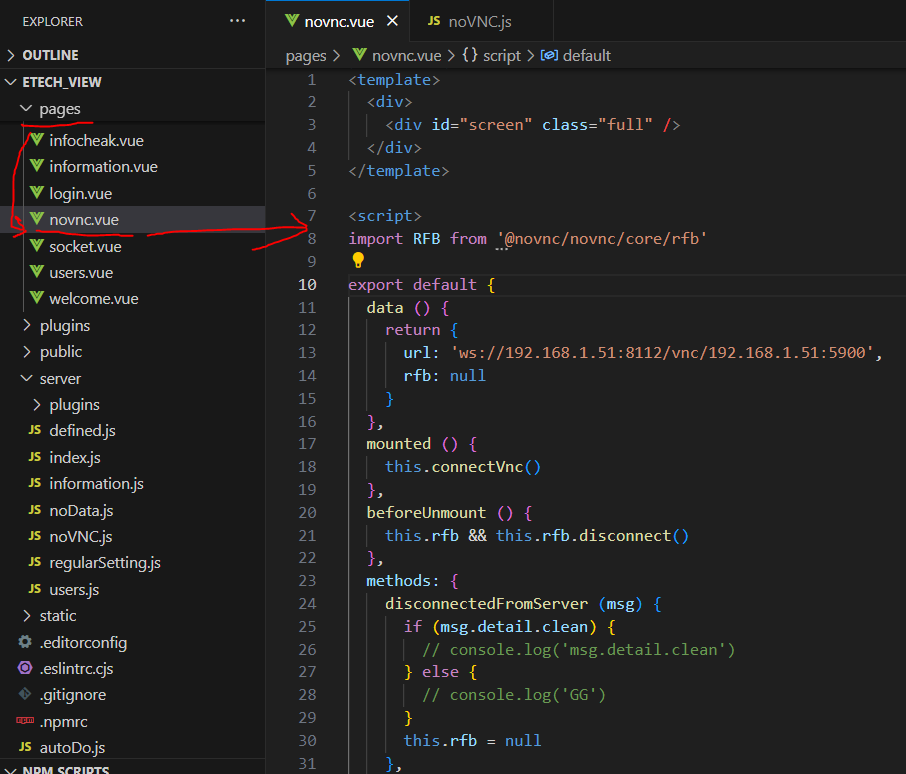
Step3. Build a novnc.vue Page For Client
When User into novnc page, the Client will use RFB(WebSocket subprotocol for RFB) to Connect WS Server , then WS Server Will Transfer RFB message to VNC Server(Two-way communication)
<template>
  <div>
    <div id="screen" class="full" />
  </div>
</template>

<script>
import RFB from '@novnc/novnc/core/rfb'

export default {
  data () {
    return {
      url: 'ws://192.168.1.51:8112/vnc/192.168.1.51:5900',
      rfb: null
    }
  },
  mounted () {
    this.connectVnc()
  },
  beforeUnmount () {
    this.rfb && this.rfb.disconnect()
  },
  methods: {
    disconnectedFromServer (msg) {
      if (msg.detail.clean) {
        // console.log('msg.detail.clean')
      } else {
        // console.log('GG')
      }
      this.rfb = null
    },
    connectedToServer () {
      console.log('Connect Success')
    },
    connectVnc () {
      const rfb = new RFB(document.getElementById('screen'), this.url, {
        credentials: { password: '1234' }
      })
      rfb.addEventListener('connect', this.connectedToServer)
      rfb.addEventListener('disconnect', this.disconnectedFromServer)

      rfb.scaleViewport = true
      rfb.resizeSession = true
      this.rfb = rfb
    }
  }
}
</script>
<style scoped>
.full{
  width: 1920px;
  height: 720px;
}
</style>
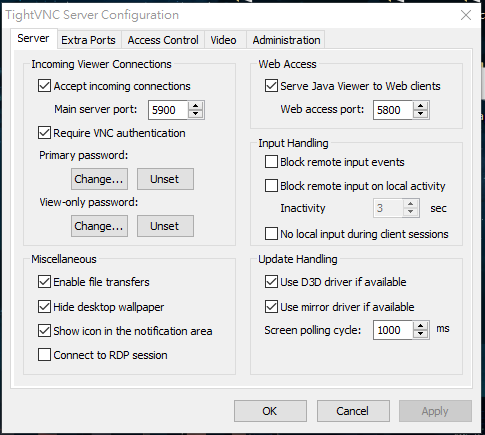
Step4. VNC Setting (TightVNC)
Use Default
Enjoy !
Comments ()